

How To Install Nail Clips On A J-box On A Lightolier 2000lvr
You can employ and install materials in Prune Studio Paint. You can find brushes, textures, color sets, gradient sets, and even animations! There are a lot to choose from in their Assets app and I do recommend you lot to use it, in case you lot're feeling similar trying and experimenting with new things.
I like to utilise their materials when I desire to add together textures to my drawings. There are a lot of textures, with different shapes and feels to choose from and it'due south actually even fun to just spend some time and endeavour them out and see the different results we can get!
How can you install and use these materials in Clip Studio? It is really very easy! Just look for the material you want and download information technology. You can now find your new cloth on the 'Textile Menu' to the right side of your screen and it's set up to use!
Of course, in that location'south a lot more to it than this and if you lot're still non used to Clip Studio Paint, I describe in detail and guide y'all through how to use the Nugget app, create an account for information technology, search, download and use your materials!
How To Install Materials In Clip Studio Paint
Installing Materials in Prune Studio Paint is very piece of cake. Mainly considering you don't need to install them per se. When browsing materials in the Clip Studio Asset store, but pick the i y'all want and click download.
The material should be ready to use correct away in the material tab. There are dissimilar types of materials that yous tin can employ, from brushes and textures to car-deportment and 3D models. Some of these need an extra step to start using. For instance, to use a downloaded castor, y'all need to drag it from the material tab to a castor/pen tab of your choice.
Otherwise, nigh of these materials you lot but need to drag them to your canvas and and then edit and utilize them equally you want!
To open this app, you simply need to click its icon on the elevation bar of Prune Studio. When you do, a new window will appear.

Information technology is important to note that this Asset app is fairly recent, so if yous can't run into it on the software, update Clip Studio Paint and so you can have access to it. Usually, Prune Studio updates automatically and will promptly open a window request if you want to visit a page with all the new updates. Either way, if you lot need to update Prune Studio merely go hither and download the latest update.
It is worth to mention that if you're not a fan of the app itself, you tin can also visit the website on your browser. It works pretty much the aforementioned fashion and you can download the materials from there.
Don't forget that for both the app or the website you need to create an account and login to be able to download any textile.
Downloading Additional Materials From Clip Studio Assets
Before we get into how y'all exactly utilize these materials, let's go through a step by footstep of how to search and download your materials equally well as some actress and useful information about the Assets app.
As I mentioned, before starting to search for materials, it's meliorate to create an account and log in, since the app volition enquire yous for it once you try to download something. So, go to the pinnacle bar of the app and click the 'Login' button.
It will open up a small window. Now cull 'Register Account…' and follow the steps. Once you're done, get to the app again and log in! Now your username should appear at the pinnacle along with how much cloud storage you have. Users become 10gb of deject storage for complimentary, so yous can back up your files and materials!

Now you're set to search for new materials! For that, look to the left of the app and click on 'Clip Studio Assets'. A vast assortment of materials will announced to choose from. If you're looking for something specific, you tin can merely write it on the search bar. For example, if you're just looking for brushes, blazon 'Brush' and the app will prove y'all simply materials tagged every bit it!
You lot can also mark materials that yous liked as favorites, by clicking on the star. This way you tin can go back to these very easily on your Favorites page.
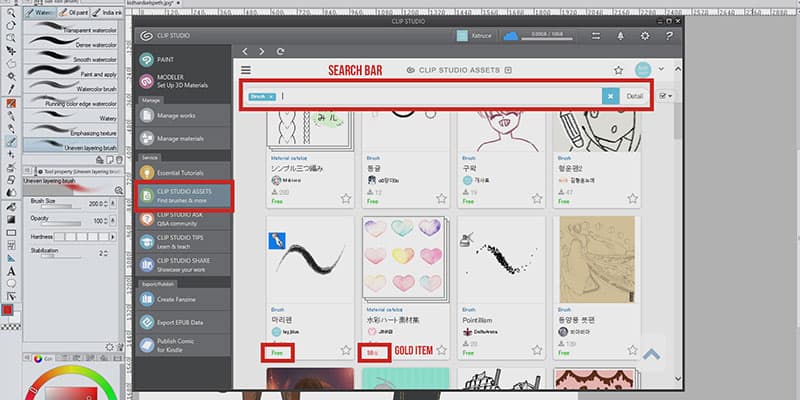
Notation that there are both free and paid assets. The paid ones are called Gilt Items and Gold is the currency used in Clip Studio Assets. To get it, yous need to buy it. Simply go to 'Account -> Bespeak Service'.
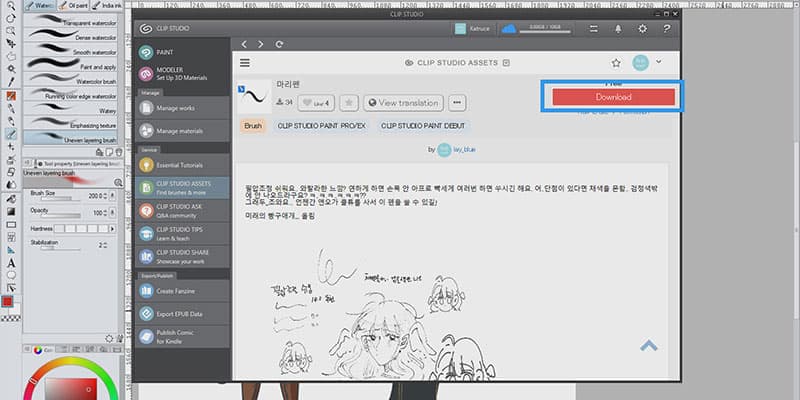
When you find something you liked and want to use, click on it. You'll be redirected to a new page. Most of these materials are made past Japanese users and they're written in Japanese. If you don't know the language only want to understand the descriptions you can click the 'View Translation' push button.
To the right of the page, you'll see correct away a red download push button. Click on information technology and your material should exist ready to apply on Clip Studio Paint right away! To admission your new material, simply go to the Material Tab and await on the 'Download' folder. If y'all can't see what you lot just downloaded right away, close the tab and become dorsum to information technology again and then it refreshes.
You might wonder if you tin can use these materials for commercial use and the respond is, yeah! All of these materials can be used for both commercial and non-commercial utilize! You tin can't share or sell them though. If you want to share these materials with a friend, send them a link of the fabric so they tin download and use every bit well.
Using The Material Palette Carte
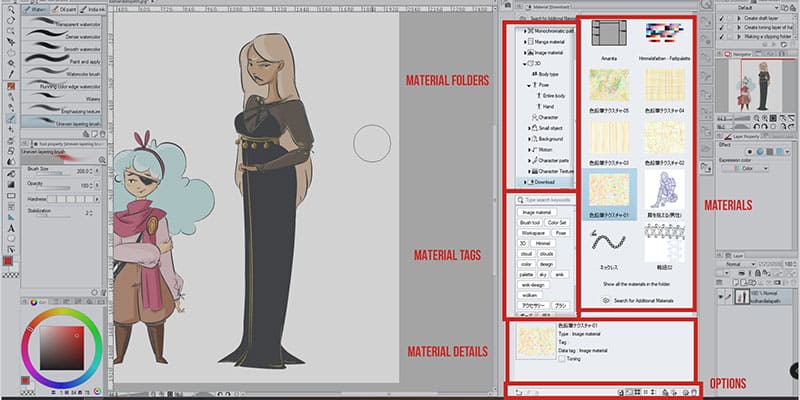
The Material palette menu is located on the right side of your screen and at outset glance, information technology might seem a lot to take on! Simply it really isn't, it's simply there'southward a lot of data thrown at us, but the menu is very easy to use and understand.
Before even opening this menu, you might observe many different little tabs on the screen. These are each folder with different kinds of materials in them. For example, if you lot're looking for 3D material, open the tab with the cube.
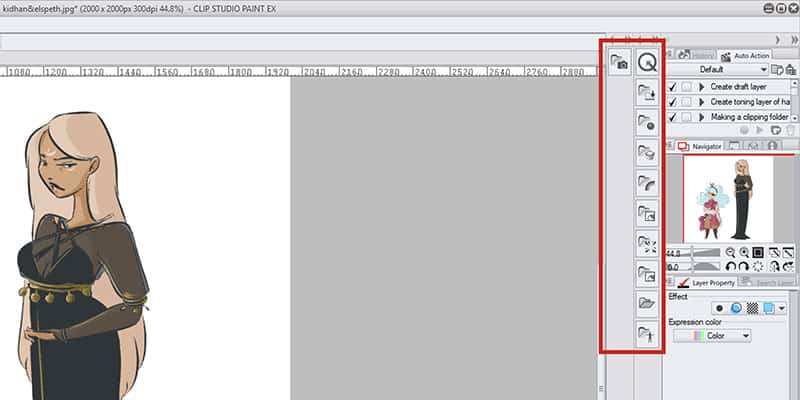
This will open up and show you all the 3D assets you have and can apply. Furthermore, inside each category, the folders are divided and organized in different types of avails, for instance, 'Pose', 'Background', 'Pocket-sized Object', etc.
Prune Studio has their materials very well organized and then yous tin find annihilation yous need, very easily and apace! Also, yous can discover specific materials past searching for their tag. Below the categories, at that place are some suggested tags that you can expect for and yous can besides type the keywords you need.
The tags are very useful to use, especially if yous decided to add your own tags to downloaded or registered materials.
Finally, when yous select a material, it will show you lot the details on the bottom of the bill of fare. Below that, you have some tools to organize your materials. For example, you tin can create new folders, alter how you view the materials, open up the textile properties (here you can add together or change tags, modify proper name and others) and even delete materials yous don't need or want anymore.
Overall it is very easy to employ. You should have quite some materials already installed even earlier downloading or registering your own materials. Then take a expect and have some fun experimenting with all the assets!
Registering Materials
You lot might desire to make your ain brushes or textures and others. You can very easily practice so. If yous desire to create your own brushes, I recommend taking a look at this step-by-footstep guide on how to make your own brush that I wrote. It is very simple and actually fun to experiment and create new and unlike brushes!
Simply giving yous a full general idea of how to annals a material, but create what you want on your sail. When you lot're finished become to 'Edit -> Register Material…' you lot can register them as images, templates or animations, depending on what you're doing.
When selecting one of them, a new window volition appear. This window is very like to the ane you meet when opening a material property. Here you can name your creation, add tags to it, choose which binder of materials it's going to and others.
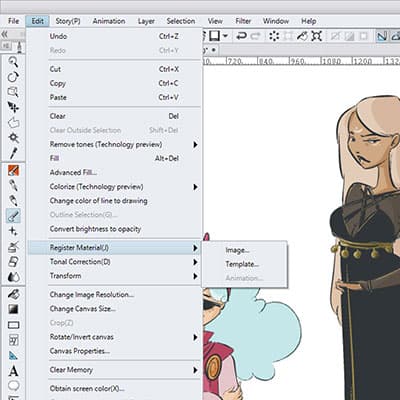
Once you're done with all the settings, click Ok and your creation should appear on the Material Carte now!
Using Materials In Clip Studio Paint
Depending on what kind of material yous want to use, yous might accept to import them to your sheet differently. Permit's go over dissimilar types of materials and how to use them!
Prototype Materials
This includes all epitome materials in the "Image Material" section, Colour Patterns, Monochromatic Patterns, Manga Materials, and fifty-fifty 3D Materials.
To use them simply click on the textile you lot desire to use and elevate it directly to the canvass or to the layers section. When doing so, it will create a new layer with the material you chose.
You tin can as well select multiple materials and drag them to your canvas. This volition also create 1 layer for each material you lot simply added. Yous tin can then edit them as you wish!
Blitheness Materials
You can find blithe materials to help you or to use as reference on your own animations. Yous can download blithe backgrounds or moving characters and even posing models. When importing it to your sail, there are two things you should have in attention:
- Be sure you lot take the Timeline showing! If the timeline is disabled, you can't open the animation yous want.
- Choose the frame where you want the animation to starting time. Even though you can motility the animation around, it's easier to cull the right frame right abroad and then drag the material to the sail.
When pasting the material, it will both paste in the canvas and timeline. It is also worth to notation that if the frame charge per unit yous're using is different from the 1 in the fabric, the one from the material will be maintained. This means that the number of frames on your timeline might change!
Sub Tools
When importing brushes material into Prune Studio, it will work differently. They will announced on the Materials menu, but every bit opposed every bit with both cases to a higher place, here you tin only drag them to the canvas and use.
You want to exist able to use it as a castor. For that, open 1 of the brushes tabs, now select the brush you desire to use from the material menu and elevate it to the brush tab you have opened.
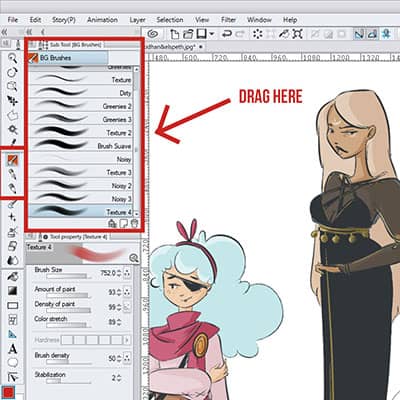
It is now set to use every bit a brush and you can even change some of its settings. If you lot desire to add more than than one brush, feel complimentary to select more than one and drag all of them at the same fourth dimension!
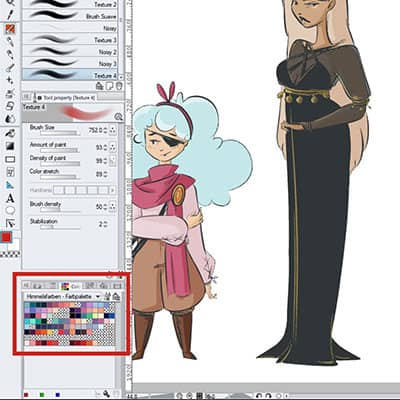
Color Sets
To import and utilise downloaded Color sets, simply select them and elevate them to the Color Set up Palette. They should be gear up to use one time you do so! If you want to change to dissimilar Color Sets, but select the superlative bar to alter and employ dissimilar color sets.
Clip Studio Paint already has quite some sets available that you tin utilise and the ones you add volition show adjacent to the pre-existing ones.
Car Action Sets
Auto-Actions are groups of minor actions that you can record and save for later use. For example, if you're making the aforementioned activeness over and over again, instead of having to repeat information technology every single time, y'all can brand an Automobile Action of it, select it and play information technology.
This fashion, Clip Studio volition make the activeness for you, making the whole process quicker! Clip Studio Pigment already has default Auto Deportment that you can utilize. To access it, look for the History Window and Car Action should exist right next to information technology.
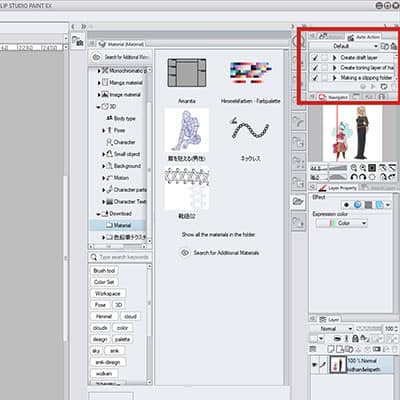
To use downloaded Auto Actions, simply select them from the Material Carte du jour and drag them to the Car Action Palette. Information technology should at present be prepare to apply!
Gradient Sets
You lot can find several Gradients and even packs of Gradients in Clip Studio Asset app that you tin can download and apply on your work. To add them and use them is very similar to what you exercise with brushes.
Go to your toolbar and select the Gradient Tool, right below the Paint Bucket. You'll notice that Clip Studio already offers you some Slope sets that y'all can use and customize as yous desire.
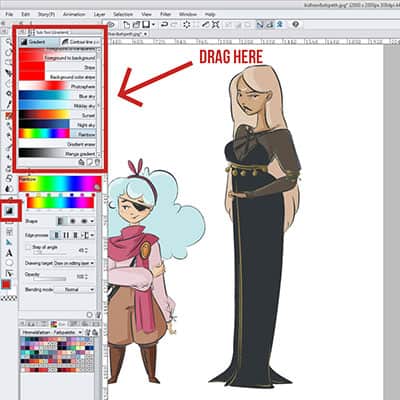
From the Textile Bill of fare, select the Slope Sets you downloaded and elevate it to the Gradient Palette. You can use your new gradients!
Workspace Fabric
You can observe on the Asset app or website several workspace materials. This is basically people's way of organizing their screen and Prune Studio's workplace. You can download these and have your menus and tabs organized differently if you feel yours isn't fully optimized or y'all don't similar how menus are distributed.
Personally, I similar to move things around every bit I like. Only sometimes it can be refreshing to endeavour different things!
To load a Workspace, select it from the Textile Menu and then drag it to the sail. When you do so, a window will appear with the Workplace settings. From hither you can choose what to load. Click Ok.
The new workspace should announced and it volition ask you lot to confirm. Y'all can and so go to Window -> Workspace and you'll discover the one y'all simply loaded shows up there. Here you can change the workspace you lot're using!
If you want to revert to your old workspace go to Window -> Workspace -> Workspace.
Back to the Blog

Source: https://doncorgi.com/blog/install-and-use-materials-in-clip-studio-paint/
Posted by: fernandezsucer1950.blogspot.com
0 Response to "How To Install Nail Clips On A J-box On A Lightolier 2000lvr"
Post a Comment